Slow Baked Chicken Breast (Moist & Tender) |
您所在的位置:网站首页 › a low heat for long hours › Slow Baked Chicken Breast (Moist & Tender) |
Slow Baked Chicken Breast (Moist & Tender)
|
Slow Baked Chicken Breast (Moist & Tender)
September 10, 2015 by victor 122 Comments
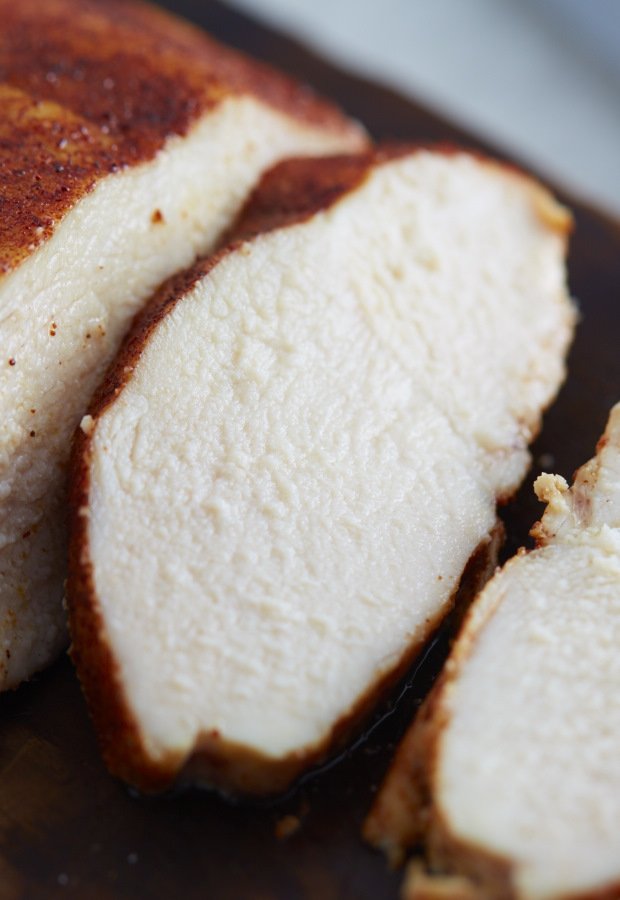
This oven-baked chicken breast recipe makes a succulent and deliciously flavorful baked chicken breast. It’s our favorite and most frequently made chicken breast in our home. The challenge with cooking chicken breastsChicken breasts seem to be the thing nowadays. They are lean, healthy and affordable. Everybody wants to include them in their diet, from bodybuilders to those who want to drop a few, to those who just want to eat healthy. When cooked right they are very flavorful, tender and tasty. The challenge is that cooking white lean meat like chicken breast can be tricky and frustrating. Even for some who call themselves professionals. How many times have you ordered chicken breast at a restaurant only to find a rubbery and chalky piece of meat on your plate? One theory is that they do it to be on the safe side because rarely can one get sick from an overcooked chicken breast. On the other hand, overcooking chicken breast is so easy that it only makes sense that the frequency of that happening is fairly high. Cooking it at home is even more challenging when you try to split your time between 10 different things. The chances of cooking a perfect chicken breast dwindle even more. A perfect way to cook a tender and juicy chicken breastHere is my solution to the problem: bake low and slow with butter and chicken stock. Don’t get me wrong, you can cook a perfect chicken breast over high heat on the stove. Though, that requires superior skills and hovering over the skillet like a hawk. I find that splitting chicken breasts in half lengthwise works the best for pan-frying, like when you make chicken piccata. This way the chicken won’t spend too much time in contact with a hot pan to get dry. The much easier approach where you can just set it and forget it is to bake chicken breasts in the oven over low heat. Why low heat? Because the lower the heat the harder it is to overcook the meat and catch the moment when it is cooked just perfectly. Cooking Temperature for Baked Chicken BreastThere is no right temperature for baking chicken breast. It can range from 225F to as high as 450F. The challenge is that at 450F the internal temperature of the chicken rises from 30-40F to the USDA recommended safe temperautre of 165F in 15 minutes or so. The rise in the final minutes of cooking can be surprisingly fast. Unless you have an accurate digital BBQ thermometer with an alarm, there is a high risk of temperature overshooting and ruining your meal. Another challenge is that at this high temperature the surface of lean meat like chicken breast may dry out before the center is fully cooked. On the flip side, cooking at a very low temperature like 225F is not very practical. This temperature is desirable for smoking when you want longer cooking time to get the right amount of smoke in the meat. This is not the case with the baked chicken breast. After a number of experiments I settled on 325F as being the best of both worlds for the baked chicken breast. At this temperature it takes regular size chicken breasts about 60 minutes to reach the perfect 165F internal temperature. Slower temperature rise allows for a wider margin of error. Even if you are a few minutes late your baked chicken breast will only be a few degrees higher than the target instead of 10-20 degrees. BriningSoaking meats in brine helps achieve a moister and juicier product. This is especially true with poultry. I don’t think anyone would argue with that. The challenge is that brining adds to preparation time. Depending on who you ask, recommended brining time for a chicken breast varies from 30 minutes to 2-4 hours. Some say that even 15 minutes of brining makes a difference, though my experience shows that for good moisture and proper flavor penetration you need about 2 hours. Stanley Marianski, the renowned author of a series of books on production of meats and sausages, suggests 2-4 hour brining for chicken parts. All that said, I am going to recommend skipping brining and try something different this time. You won’t be disappointed.
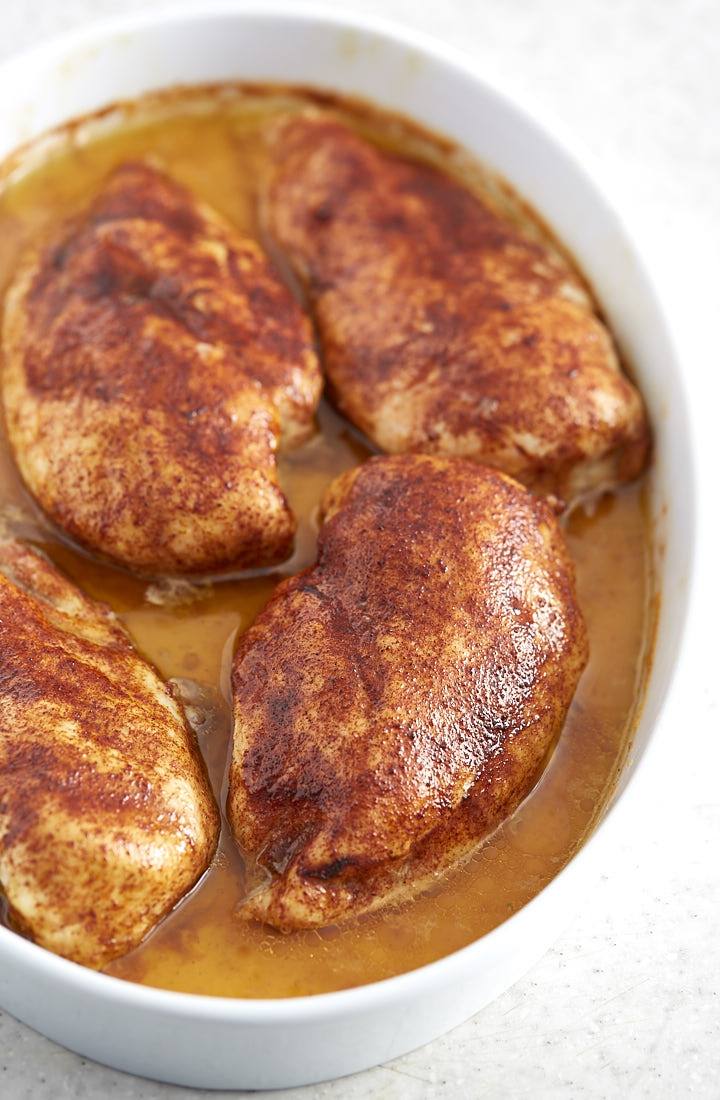
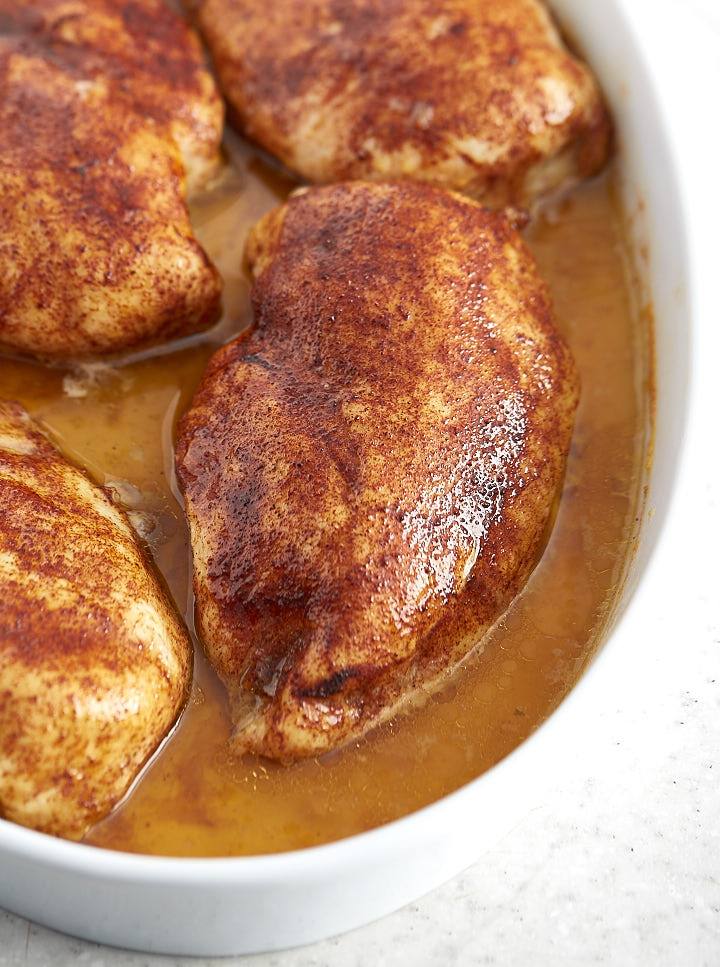
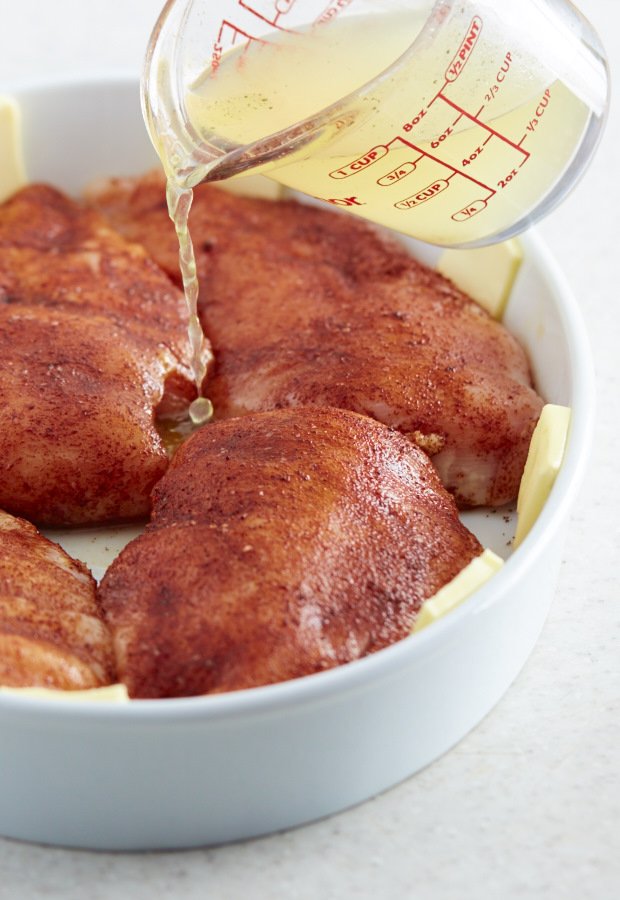
While watching an episode of some cooking show a while ago, I got inspired to try something else. Instead of brining one of the contestants added butter and some commercial oil and vinegar based marinade to the baking pan filled with chicken parts. Then the pan went right into a smoker. Suffice it to say, his was the winning chicken. Not being a fan of too much oil or vinegar in my chicken I used a little bit of butter and chicken stock instead. The result – one of the most succulent and flavorful chicken breasts I have ever had. During baking chicken breasts absorbed some of the liquid and the butter, and became wonderfully tender and moist. Even slightly buttery. This is the method I now predominantly use for baking or smoking chicken breasts. How to make baked chicken breast?Follow these three easy steps and you will have one of the best baked chicken breast meals. Step 1 – Apply the Rub, add Butter and Chicken StockIn this recipe I use a little bit of salt, some sugar for a hint of sweetness, some cayenne pepper for a little kick and enough paprika to give the meat its beautiful color and flavor. This rub is perfect if you are looking for mild flavors that just about anyone will enjoy. What I like about this rub the most is that is has a very balanced taste. You may put on a thin layer of vegetable or olive oil before applying the rub. This will ensure that the rub sticks to the meat. Oiling chicken breasts is not absolutely necessary as the rub will stick to wet meat just as well. Stick pats of butter around the perimeter of the baking pan. As the butter melts it will seep down to the bottom of the pan enhancing the chicken’s flavor and adding to its tenderness. Pour 1/2 a cup of chicken stock into the pan. Do it carefully so as no to wash off the rub from the meat. You need just enough stock to cover the bottom of the pan about 1/4 inch high.
The baking process is very straightforward. I typically baste the meat once with its own juices about 20-30 minutes before it’s done. I do believe that it helps keep the surface of meat adequately moist. Flipping the breasts is not required. As a matter of fact, it may negatively affect appearance. Start checking the temperature after about 50 minutes with an instant read thermometer. My personal favorite is the ThermoWorks Thermapen thermometer Update from June 29, 2016: Over the past several months I’ve been experimenting with using my BBQ thermometer while cooking chicken breasts and other larger cuts of meat in the oven. I am blown away by the results! This is now my preferred method of hitting the right temperature. It’s simple and hassle free. You don’t need to run back and forth checking your chicken for doneness. You don’t need to open your oven a dozen of times and let the hot air out, extending the cooking time. Here is how it works:
Insert the tip of the probe into the thickest part of the chicken breast and set the alarm to 165F. That’s it. It’s the simplest way to get a perfectly cooked chicken breast every time. If you are after the most optimal results, bake the breasts to 160F instead of 165F as the temperature will rise by about 5 degrees during the 5 minute rest period. This will ensure that the meat is safe to eat and is optimally tender and juicy.
I use the ThermoWorks BBQ thermometer with professional Type K thermocouple probes. I chose it specifically because of the high heat probes that won’t burn out easily when exposed to high temperatures during grilling or smoking, which I do a lot of. These thermometers are fairly expensive and an overkill for oven cooking. For cooking in a kitchen oven, a regular BBQ thermometer like the very good and the very popular ThermoPro TP08 will work perfectly well and should last a very long time with proper care.
ThermoPro TP08 has two probes, one of the food and the other one is for monitoring oven/grill/smoker temperature. The second probe may not seem like a big deal for the kitchen oven, but it can be very helpful if the thermostat in your oven is not working properly and the actual temperature differs from the set temperature. Step 3 – Let it RestLetting the baked chicken breast rest after cooking is crucial. During the rest meat fibers will reabsorb some of the moisture they lost while cooking. If you cut the meat immediately, the juices will quickly run off and make the meat drier. Five minutes of rest is enough. Now, slice your perfectly baked chicken breast and enjoy! You may want to try using the juices from the baking pan as a dipping sauce for the chicken. It’s absolutely delicious.
If you happen to have leftover chicken breast, use it to make my Seriously Good Homemade Chicken Pot Pie. You will love it. Or this Mulligatawny Soup. It’s the best. 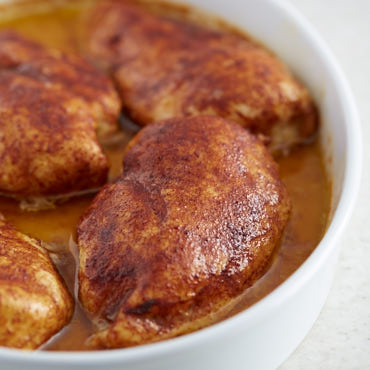 Slow Baked Chicken Breast (Moist & Tender)
A recipe for a very tender and succulent oven baked chicken breast.
4.96 from 45 votes
Print
Pin
Rate
Course: Dinner, lunchCuisine: AmericanKeyword: baked chicken breast, juicy chicken breast, roasted chicken breast
Prep Time: 10 minutes minutesCook Time: 1 hour hourTotal Time: 1 hour hour 10 minutes minutes
Servings: 4
Calories: 257kcal
Author: Victor
Ingredients4 skinless boneless chicken breasts1/2 tsp kosher salt1/2 tsp cane sugar1/8 tsp cayenne pepper2 tsp paprika2 tsp olive oil (or vegetable oil)4 Tbsp butter (unsalted; 1/2 stick sliced into 8 thin pats)1/2 cup chicken broth
InstructionsPreheat oven to 325FPrepare the rub by mixing salt, sugar, cayenne pepper and paprika. Cover the chicken breasts with a thin layer of vegetable or olive oil first to ensure that the rub adheres properly. Cover each chicken breast with an even layer of the rub.Place chicken breasts in a deep baking dish. Stick butter pats to the sides of the baking dish. Pour chicken broth into the baking dish carefully so as not to wash away the rub.Bake at 325F uncovered for about 60 minutes until the internal temperature reaches 165F. To make sure the chicken tops are nicely browned and do not dry out, baste the chicken breasts in the juices 30-40 minutes into baking.Remove from the oven, let rest for 5 minutes and serve your perfectly baked chicken breast.
NotesYou may also want to try baking the chicken to 162F internal for optimal results. If you cook the meat to 162F and let it rest for 5 minutes, the temperature will rise by 3-4 degrees based on my experiments and the chicken will reach the safe temperature of 165F.
Try using the juices from the pan as a dipping sauce for the chicken. It's delightful.
NutritionCalories: 257kcal | Carbohydrates: 1g | Protein: 24g | Fat: 16g | Saturated Fat: 8g | Cholesterol: 102mg | Sodium: 631mg | Potassium: 467mg | Fiber: 0g | Sugar: 0g | Vitamin A: 980IU | Vitamin C: 3.4mg | Calcium: 12mg | Iron: 0.7mg
Previous PostNext Post
Slow Baked Chicken Breast (Moist & Tender)
A recipe for a very tender and succulent oven baked chicken breast.
4.96 from 45 votes
Print
Pin
Rate
Course: Dinner, lunchCuisine: AmericanKeyword: baked chicken breast, juicy chicken breast, roasted chicken breast
Prep Time: 10 minutes minutesCook Time: 1 hour hourTotal Time: 1 hour hour 10 minutes minutes
Servings: 4
Calories: 257kcal
Author: Victor
Ingredients4 skinless boneless chicken breasts1/2 tsp kosher salt1/2 tsp cane sugar1/8 tsp cayenne pepper2 tsp paprika2 tsp olive oil (or vegetable oil)4 Tbsp butter (unsalted; 1/2 stick sliced into 8 thin pats)1/2 cup chicken broth
InstructionsPreheat oven to 325FPrepare the rub by mixing salt, sugar, cayenne pepper and paprika. Cover the chicken breasts with a thin layer of vegetable or olive oil first to ensure that the rub adheres properly. Cover each chicken breast with an even layer of the rub.Place chicken breasts in a deep baking dish. Stick butter pats to the sides of the baking dish. Pour chicken broth into the baking dish carefully so as not to wash away the rub.Bake at 325F uncovered for about 60 minutes until the internal temperature reaches 165F. To make sure the chicken tops are nicely browned and do not dry out, baste the chicken breasts in the juices 30-40 minutes into baking.Remove from the oven, let rest for 5 minutes and serve your perfectly baked chicken breast.
NotesYou may also want to try baking the chicken to 162F internal for optimal results. If you cook the meat to 162F and let it rest for 5 minutes, the temperature will rise by 3-4 degrees based on my experiments and the chicken will reach the safe temperature of 165F.
Try using the juices from the pan as a dipping sauce for the chicken. It's delightful.
NutritionCalories: 257kcal | Carbohydrates: 1g | Protein: 24g | Fat: 16g | Saturated Fat: 8g | Cholesterol: 102mg | Sodium: 631mg | Potassium: 467mg | Fiber: 0g | Sugar: 0g | Vitamin A: 980IU | Vitamin C: 3.4mg | Calcium: 12mg | Iron: 0.7mg
Previous PostNext Post
|


【本文地址】